Whenever we are faced with Network issues it would be really frustrating,sometimes if you are net
addict then that would be the serious problem,though there are hundreds of Ways to diagonise the
network problem,we need to perform every possible solutions like updating drivers, examining the
DNS, configuring the router, Configuring IP like Whether it is static or dynamic and much more
which is the correct procedure whenever it comes to Network. But when we did such tasks,it would make us an intermediate in the Networking,which is a vast concept and following those steps requires
a very much time.
So,in this post let's see how to perform network diagnostic in Windows 10,with a simple fix it tool.
Note : This is an Official tool from Microsoft,so you don't need to get panic.
1) Download the tool from the link below
http://aka.ms/diag_networking10
2) Run it..
3) You will find Advanced Option on that window,click on it,which will allow an option to Run as Administrator
4) Click on it.
5) Now,Check the box "Apply repairs Automatically"
6) Click Next.
7) Wait for sometime,it will scan for possible solutions,and will
automatically fix the issue, Click Finish/close.
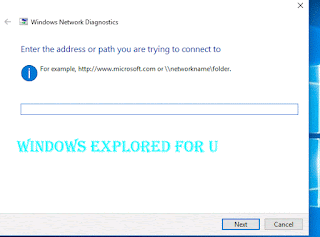
If you have problem in accessing the Particular site,then
Click on I'm trying to reach a specific website or folder on a network,option that comes after
verifing your network.
Enter the Website address for example : Windowsexploredforu.blogspot.com

Click Next.
It will start to collect the info and will fix the issue...
If you a different problem,then click on I'm having a different Problem.
Now,click on Your Problem,for example : Use a specific network Adapter
Now,follow the onscreen instructions,based on your problem..
Hope it helps..
addict then that would be the serious problem,though there are hundreds of Ways to diagonise the
network problem,we need to perform every possible solutions like updating drivers, examining the
DNS, configuring the router, Configuring IP like Whether it is static or dynamic and much more
which is the correct procedure whenever it comes to Network. But when we did such tasks,it would make us an intermediate in the Networking,which is a vast concept and following those steps requires
a very much time.
So,in this post let's see how to perform network diagnostic in Windows 10,with a simple fix it tool.
Note : This is an Official tool from Microsoft,so you don't need to get panic.
1) Download the tool from the link below
http://aka.ms/diag_networking10
2) Run it..
3) You will find Advanced Option on that window,click on it,which will allow an option to Run as Administrator
4) Click on it.
5) Now,Check the box "Apply repairs Automatically"
6) Click Next.
7) Wait for sometime,it will scan for possible solutions,and will
automatically fix the issue, Click Finish/close.
If you have problem in accessing the Particular site,then
Click on I'm trying to reach a specific website or folder on a network,option that comes after
verifing your network.
Enter the Website address for example : Windowsexploredforu.blogspot.com

Click Next.
It will start to collect the info and will fix the issue...
If you a different problem,then click on I'm having a different Problem.
Now,click on Your Problem,for example : Use a specific network Adapter
Now,follow the onscreen instructions,based on your problem..
Hope it helps..
