September 2015

Clear file history in Windows 10

Hi Friend,In this tutorial lets see how to Clear file History in Windows 10.

What is File History ???

File History is an Option Used in Windows Where Our Recent File history is Stored. 

Windows Saves the Recent history of files and Command We Used or We Opened. This 

Process is Useful if We need to Quickly access the File that We Opened last.But it May 

Also Serve as a Privacy Concern,So in this tutorial lets See how to Clear recently Opened 

File history in Windows 10.


Clear file history in Windows 10


How to Clear it ???

If You Wish to Clear File History in Windows then just Follow the Steps below in Your 

Windows PC.


Step 1 : Login to Your Windows 10 PC(Which is the Primitive Step !!) 

Step 2 : Press Windows + E or Open This PC

[See : How to Create Shortcut for My computer(This PC) in Windows 10]

Step 3 : Click on File tab,Which is on top of the tab.

Step 4 : Select Change Folder and Search Options / Options.

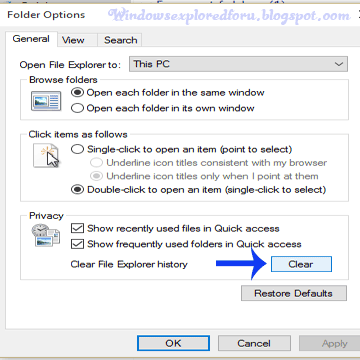
Step 5 : A new Window Will open,On that Find Privacy Option.

Step 6 : Under Privacy option,Click on Clear.


Clear file history in Windows 10


Step 7 : If needed Close the Window.

That's it...

[Also See : How to Make Windows to not Save recently Opened items in Windows 10]

Turn on or Off Auto Arrange in Windows 10

What is Auto Arrange ???

Auto Arrange is an Setting Which Will Arrange Automatically the icons and Folders that Are 

Saved in location.We Can See this in Common While We Paste Shortcuts to the location 

example :desktop,the Shortcuts Will be Auto Arranged Providing a Clean look.Else the 

Shortcuts Will be Placed One on right side and Other on Other Sides like 

left,right,top,bottom,etc.So If You Focused on Providing a clean look then this Might Help 

You.

How to do it ???

Turning on or off Auto Arrange Icons is an Very easy Process, You may

Already Seen it Accidentally or Even You Are Aware of this.So,If You Still Can't figure Out 

or if You Had Forget,then My Friend just follow the Upcoming Steps.

Step 1 : Login to Your Windows 10 PC.

Step 2 : Select the Location Where You need to Paste,Example:desktop.

To Turn on :


  • Right Click on empty Area of the desktop.


  • Click on View.


  • Check Auto Arrange Icons & Align icons to grid by Clicking on it.
Turn on or Off Auto Arrange in Windows 10


To Turn off :

If You Wish to turn off this Setting then don't Worry,Simply


  • Right Click on empty Area of the desktop.


  • Click on View.


  • Uncheck Auto Arrange Icons & Align icons to grid by Clicking on it.


That's it...

Control data sent to Microsoft Windows 10

Hi Welcome Again,In this Tutorial lets see how to change the Feedback data that are Sent t

to Microsoft.

[Also see : 20 things you need to do to protect your privacy in Windows 10]

What is Feedback ???

Feedback is an Important Part in Our life Whether it is For Product or others,Feedbacks 

helps us to Improve Our Skills/products. Microsoft too introduced Feedback in its Windows 

Editions for Serving as Better. All it do in Windows 10 Is through Windows 10 Feedback 

App Which We Explained in Our Previous Article [Check this link !!].

How to Control ???

Controlling Feedback App is an Important Part as it Maylead to Privacy concern. This is 

Because When We Tried A new App We Are Prompted to Provide Feedback,When We 

Provided Feedback all Our Usage on that App Are Stored and Sent to Microsoft,Which 

Microsoft Checks for User Experience... So lets See How to control this,Just Follow the 

Steps as it is in Your Windows 10 PC.

Step 1 : Login to your Windows 10 PC.

Step 2 : Open Settings.

[See : How to Open Settings]

Step 3 : Click on Privacy.

Step 4 : A new Window Will Open With General as First Option,Click on Feedback & 

diagnostics Which Will be on left pane.

Step 5 : Find and Click under Diagnostic and Usage data,Which Will be on right Pane.

Step 6 : And the Option is Enhanced by default,Click and Change it to Basic.


Control data sent to Microsoft Windows 10


Step 7 : Close the Window.

That's it.. 

Turn on or off Feedback settings in Windows 10

Hello and Welcome to Our Blog,In this Tutorial lets see how to turn on or off Feedback 

frequency in Windows 10.

What is Feedback Frequency ???

Feedback frequency is an Option in Windows 10,from Which Microsoft Asks Users 

Feedback about this Windows 10. This Feedback Frequency Will be Used by Microsoft for 

Further improving their Products and Making them to Serve as More...So in this Tutorial lets 

See how to turn on and Off this Setting in Windows 10.

How to do it???

Turning on and Off this Setting is an Easy Process,All you need to do is My friend is to just 

follow the Steps below...

Step 1 : Login to your Windows 10 PC.

Step 2 : Open Settings.

[See : How to Open Settings]

Step 3 : Click on Privacy.

Step 4 : A new Window Will Open With General as First Option,Click on Feedback & 

diagonistics Which Will be on left pane.

Turn on or off Windows Feedback settings in Windows 10


To Turn on :


  • Follow Steps 1 to 4.


  • Click under Windows Will Ask My Feedback Which Will be Under Feedback Frequeny on right Pane.


  • Select and Change Automatic to Once in A Day or other (except never).


To Turn off :


  • Follow Steps 1 to 4 .


  • Click under Windows Will Ask My Feedback Which Will be Under Feedback Frequeny on right Pane.


  • Change Automatic or Anything in it to Never.


That's it...

Switch user in Windows 10

Hi and welcome to our blog,In this tutorial let see how to switch user in Windows.

What is Switch user ????

If Your PC has morethan one User Account,and the other Person need to login to your 

PC,then You Can Switch to that Account Without logging out from your logged Account.For 

that Purpose Switch User Function is Used.

Got it ??? then Follow the Steps to Access the Function.

How to Switch User ???

There are numerous Methods Available to Switch User Account in Windows. Following Are 

the Easiest Way of Switching...

Method 1 : Using ctrl,alt,del Keys...

Step 1 : Login to Your Windows 10 PC.

Step 2 : Press ctrl + Alt + Del Keys.

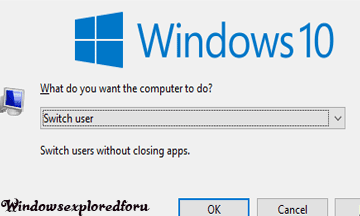
Step 3 : A New Window Will Open Select Switch User.

Method 2 : Using Alt + f4.


Step 1 : Login to Your Windows 10 PC.

Step 2 :Press Alt + F4 Keys,Simultaneously

Step 3 :Scroll down/up and Select Switch User Account.

Switch user in Windows 10


Method 3 : Using Run COmmand.


Step 1 : Open Run COmmand, by Pressing Windows + R Keys.

Step 2 : Type tsdiscon

Switch user in Windows 10


Step 3 : Select Ok.

That's it...

Turn on or off Fast Startup in Windows 10

In this Article lets see how to turn on or off Fast boot in Windows 10.

What is Fast boot ???

Fast boot is an Option introduced in Earlier Windows Editions like Windows 8, and Since it 

become huge Success it followed to other editions too. This Fast boot is an Option 

designed for fast booting our PC.

How to Check Whether Fast boot is Enabled or disabled ???

By default Fast boot is enabled in Windows 10 Os.We need to Makesure Whether Fast 

boot is enabled or not Which help in Faster booting of Our PC.If had enabled hibernate 

Mode,then it indicates Fast boot is enabled.

If You Wish to disable or enable Fast boot then follow the Steps below as it is in Your 

Windows 10 PC.


Step 1 : Login to Your Windows 10 PC.

Step 2 : Open Control Panel.

[See : How to Open Control Panel Easily]

Step 3 : Click on Hardware and Sound.

Step 4 : Find and Click On Change What the Power buttons do.

"the Option Change What the Power button do Will be Available under Power Options.

Step 5 : Click on Change Settings that Are unavailable on the Window that Opens.

Turn on or off Fast Startup in Windows 10


To Enable Fast Boot :


  • Follow Steps 1 to 5.


  • Find and Check Turn on Fast Startup Option.

  • Click on Save Changes.
Turn on or off Fast Startup in Windows 10


To disable Fast Boot :


  • Follow Steps 1 to 5 


  • Uncheck Turn on fast startup Option.

  • Click on Save Changes.


Close the Window.

That's it...

Turn or off flash in Microsoft Edge in Windows 10

Hi Friend,Welcome to Our blog. in this tutorial lets see how to turn on or off flash in 

Microsoft edge,a new brand browser integrated to Windows 10.

What is flash ???

It is an extension/Software platform used in browsers for providing vector graphics,browser 

games,rich internet applications,etc.. It is used to display texts,Vector and raster graphics, 

animation,Streaming Videos,etc... 

To read more about flash Check this Wikipedia Article

How to Enable or disable ???


If You Wish to turn/off flash for Microsoft edge then just follow the Following 

Steps.

Step 1 : Login to Your Windows 10 PC.

Step 2 : Open Edge Browser.

Step 3 : Click on Settings.

Step 4 : Again Click on View Advanced Settings under Advanced Settings.


Turn or off flash in Microsoft Edge in Windows 10


To Turn on Flash:


  • Scroll down and Find Use Adobe flash Player.


  • Slide/Click on Right Side.


To turn off Flash:


  • Follow Steps 1,2,3,4.


  • Scroll down and Find Use Adobe flash Player.


  • Slide/Click on left side.

That's it...

Restart explorer Shortcut in Windows 10

Hello Friend,Hope You Are good.Windows explorer is an Important Process needed for 

Windows PC,As We Explained in Our Previous Article.So here is an Another tutorial for 

Creating Shortcut for Restart Explorer.exe in Windows 10.

How to Create Shortcut for Explorer.exe???

If You Planned to Create Shortcut for Windows Explorer then just Follow the Steps As it is 

in Your Windows 10 PC. 

Step 1 : Login to Your Windows 10.

Step 2 : Press Windows + R Key.

Step 3 : Type Notepad.

Step 4 : Hit Enter.

It Will Open the Notepad On that type the Following.

@echo off

taskbill /f /im explorer.exe

Start explorer.exe


Restart explorer Shortcut in Windows 10


Step 5 : Click on File.

Step 6 : Select Save as...

Step 7 : Type the name as Explorer.bat


Restart explorer Shortcut in Windows 10


Step 8 : Select Where your Shortcut needs to be Placed,example :Desktop.

Step 9 : Click on Save.

Step 10 : Close the Window if needed.

Now You can Access Explorer directly from desktop.

That's it...

Restart explorer.exe in Windows 10 - How to restart explorer.exe without cmd and powershell [Updated]

How to restart explorer.exe service in Windows 10 - that's what we're going to see in this post. Restarting explorer.exe will greatly help in many times particularly when our system hangs for a long duration, Taskbar appearing on top of Youtube video and much more common errors. Explorer is one of the important Process used in Windows,many things like desktop,taskbar,File explorer,Start menu,etc.. depends on this explorer indirectly/directly.

Enough said, let's see..


How to restart explorer.exe in Windows 10


To restart explorer there are number of Ways available.But herewith i will Share you only Some easiest methods without the use of cmd, powershell as it should be beginner friendly.Just follow the Steps below as it is in your Windows 10 PC.

Method 1 : Using Taskmanager.

Step 1 : Login to Your Windows 10 PC.

Step 2 : Press Control + Alt + del keys all at once.

Step 3 : Click on Task manager.

Step 4 : Find and Right Click on Windows Explorer.


restart explorer in Windows 10


Step 5 : Click on restart.

Method 2 : Using Run Command.

Step 1 : Login to Your Windows 10 PC.

Step 2 : Press Control + Alt + del keys all at once.

Step 3 : Click on Task manager.

Step 4 : Click on File and Select Run new Task.

(or) Press Windows + R Key.

Step 5 : Type explorer.exe


restart explorer in Windows 10


Step 6 : Click on OK.


That's it...

Know any other Easiest Ways ??? Share your tip With US...We love to hear from you!

Other related articles :

How to Clear event viewer in windows 10 [Guide]

Change alert level of low battery notification in windows 10

Clear event viewer all logs in windows 10 latest version - How to guide

Clear event viewer in Windows 10, How to ? that's what we're gonna see in this post. So, if you wish to clear all event logs on your Windows 10 PC which gets logged not only whenever there was an issue with the program, but also for normal activities of yours in Windows 10 then here is an guide for you.

So, What is Event Viewer ???

Event Viewer is an Useful tool Which displays information about events like Program that 
doesn't Starts or closed Unexpectedly, basically a logger. This tool is used by professionals to find out where the particular issue has happened. as it records most of the activity a user did in that particular PC. 

How to Clear event viewer log files ???

If You Wish to Clear Event Viewer log files,then follow the Steps below..  

Step 1 : Login to Your Windows 10 PC.

Step 2 : Press Windows + R Keys.

Step 3 : Type eventvwr.msc

Step 4 : Hit OK.

Step 5 : It Will Open a new Window,Which is Known as Event Viewer,on that do as follows.

Step 6 : Select an event,Example:Error.


clear event viewer windows 10


Step 7 : Click on Clear log Which Will be on right pane.

Step 8 : If need,Close the Window.

That's it...

How to clear all event logs using Command Prompt (CMD)or Powershell ?


1) Open powershell

2) Copy/paste type the following line and Hit enter.

wevtutil el | Foreach-Object {wevtutil cl "$_"}

-Hope it is helpful.

Change alert level of low battery in windows 10

Windows 10 is lot of different from its Predecessors Because of its UI and Other Useful 

Background Apps,But As Explained in Our Previous Article,They Consume Battery Of PC. 

So Here is an Another tutorial for Changing Battery low alert in Windows 10.

What is low battery alert???

We Can Make Our PC to display low battery notification. Usually Windows Will notify 

Whenever Our Battery Reaches at 10 % So if You Wish to Make Windows to notify You 

Before reaching 10 % Which Means like getting Alert at 15%,20% etc.,then Continue 

reading...

How to Enable???

If you Planned to enable Energy Saver mode then follow the steps below.

Step 1 : Login to Your PC(Which is The Primitive Step)

Step 2 : Open Control Panel.

[See : How to Open Control Panel Easily]

Step 3 : Click On Hardware And Sound.

Step 4 : A New Window Will Open On that Select, Power Options Which Will Be on the 

Right Pane,Below to Sound.

Step 5 : Click On Change When the Computer Sleeps.Which Will Be on Left Pane.

Step 6 : Click on Change Advanced Power Settings.

Step 7 : It Will Open A new Window,Click on Battery.

Step 8 : Click on low battery level.


Change alert level of low battery in windows 10


Step 9 :  Select the Percentage You Wish to Make Windows notify you.

"Example : If You Wish to Make alert level While your battery is at 12%,Change the Value 

into 12,etc...

Step 10 : Click on Apply

Step 11 : Click on OK.

Step 12 : If Need Close the Window.

That's it...

From Now Your PC Will Notify You Whenever Your PC reaches the desired level...

Hide Removal drives in My Computer in Windows 10

Hi friend,Welcome to Our Blog,in this tutorial lets see how to hide drives from navigation 

Pane.

Navigation Pane is the One Which Makes us easy to Use and navigate everywhere inside 

the PC.

So if You wish to hide the drives then Perform the following Changes inside registry.All You 

need to do is just follow the Upcoming Steps as it is in your Windows 10 PC.

Step 1 : Login to Your Windows 10 PC.

Step 2 : Press Windows + R Key.

Step 3 : Type regedit

Step 4 : Click\tap enter.

Step 5 : It Will Open Registry editor,on that Navigate to following.

HKEY_LOCAL_MACHINE\SOFTWARE\Microsoft\Windows\CurrentVersion\Explorer\Desktop\NameSpace\DelegateFolders\{F5FB2C77-0E2F-4A16-A381-3E560C68BC83}

Step 6 : Rename {F5FB2C77-0E2F-4A16-A381-3E560C68BC83} as {-F5FB2C77-0E2F-4A16-A381-3E560C68BC83} by just adding Hyphen behind it.

Hide Removal drives in My Computer in Windows 10


Step 9 : Close the Window.

Step 10 : Now again Open the explorer for note Changes,


If You Wish to restore this,then Simply rename  to  {-F5FB2C77-0E2F-4A16-A381-3E560C68BC83} as {F5FB2C77-0E2F-4A16-A381-3E560C68BC83}.

That's it...

Other Articles:

How to disable Cortana???

How to Delete Account Picture History in Windows 10???

And More...

Display Switch Shortcut in Windows 10

Hi Friend,Glad to help you again,in this tutorial lets see how to create shortcut for Switching display.

What is display Switch ???

Display Switch is the one Which is Particularly Useful incase you have Multiple displays 

Connected to Your PC.

You Can normally Switch this using Shortcut Keys (Windows Key + P Key),Which takes us 

to projector.

So,you Can Also Create shortcut for display switch like We Created Shortcut for desktop 

background,battersaver,etc.. 

How to create it???

To Create shortcut for display Switching,Follow the Steps below.

Step 1 : Login to Your Windows 10 PC.

Step 2 : Right click on empty area of desktop and Select New-> Shortcut.

Step 3 : It Will Open a New Window Where You Will be Prompted to Enter Location.


Step 4 : Type the following inside the Box.


%windir%\System32\DisplaySwitch.exe


Step 5 : Click On Next.

Step 6 : Type the Name of the Shortcut,Example: Display Switch


Display Switch Shortcut in Windows 10


.
Step 7 : Click On Finish.

Step 8 : If You Wish,You Can Change the Icon for this Shortcut.


[Click to See : How to Change Icon for Any App/Shortcut in Windows 10]

Now You Can Switch Your directly When You Clicked On this Shortcut.

That's it.

Other Articles:


How to Check Battery Health???


How to Make Windows Sign in Automatically Without Password in Windows 10???


And More...