How to turn on file history in Windows 10, that's what we're going to see in this post. File history is an important you should know about as it will help you to recover your important files incase of its corrupted or lost/ damaged. So, with that being said let's see how to enable or turn on file history in Windows 10.
Just Follow the Steps Below.
Step 1 : Login to Your User Account.
Step 2 : Open Settings.
[See : Easy Ways to Open Settings]
Step 3 : Click On Update and Recovery.

Step 4 : Click On Backup On the Window that Opens.
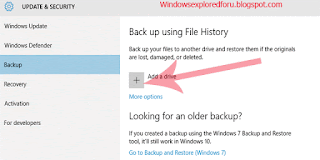
Step 5 : Connect Your Drive and Backup.
Alternative Way...
Step 1 : Login to Your Pc.
Step 2 : When You Reach Desktop,Press Windows + q Key.
Step 3 : It Will Open search bar. Type As"File History Settings".

Step 4 : It Will open Backup.
Step 5 : On that, Select drive After Plugging Removal drive.
Step 6 : Backup and Enjoy..
Other articles :
Backup files in Windows 10 to external drive without any software [How to guide]
Review Your Computer Status in Windows 10
What is control panel in Windows 10 computer ??? [Beginner's guide]
Just Follow the Steps Below.
Step 1 : Login to Your User Account.
Step 2 : Open Settings.
[See : Easy Ways to Open Settings]
Step 3 : Click On Update and Recovery.

Step 4 : Click On Backup On the Window that Opens.
Step 5 : Connect Your Drive and Backup.

Alternative Way...
Step 1 : Login to Your Pc.
Step 2 : When You Reach Desktop,Press Windows + q Key.
Step 3 : It Will Open search bar. Type As"File History Settings".

Step 4 : It Will open Backup.
Step 5 : On that, Select drive After Plugging Removal drive.
Step 6 : Backup and Enjoy..
Other articles :
Backup files in Windows 10 to external drive without any software [How to guide]
Review Your Computer Status in Windows 10
What is control panel in Windows 10 computer ??? [Beginner's guide]