} -->
Showing posts with label Windows 8. Show all posts

Write Protection For USB devices on Windows 10 - Howto [Tutorial]

Though we took varies security measures to prevent our PC's from harmful persons like hackers they 

still find a way to exploit a new bug or enter into our PC,that will turn into even worse when they 

have physical access to Our PC. They can do anything when they have access to our PC like copying 

our data to a external hard disk or some USB which can't be prevented with our basic settings.So,in 

this tutorial let's see how to add a write protection to our Windows PC's,which will prevent write 

access to other devices even though they have administrator permissions..

This feature only works with registry tweaks apart from Group policy changes..

So,even if you don't have group policy editor,then you too can get this..

Just follow the below steps..


[To Assist you better i had created the above video tutorial,if you stuck with any steps then check it]


1) Press Windows + R Keys.

2) Type regedit

3) Hit enter.

4) Navigate to following Key..

HKEY_LOCAL_MACHINE\SYSTEM\CurrentControlSet\Control

5) Now,right click on the Control (folder) it will display options like Collapse,New,Find,Delete,etc.. on that 

Select New - > Key.

6) Name it as StorageDevicePolicies - > Hit Enter.

7) Now,on your right pane,Right click on the empty area,and 

select New - > DWORD(32-bit) Value..

Note: You need to choose DWORD even though you are using 64bit version of Windows.

8) Name it as WriteProtect

9) Now,double click on it and set its value data from 0 to 1.

That's it..

Now,anyone who connects an USB device and wish to transfer will see an error message "This disk/ 

device is write protected) when they try to copy,edit contents to USB..

If you wish to revert to normal,then simply delete the registry Key or set its value to 0.

For Persons who have Group policy...

1) 1) Press Windows + R Keys.

2) Type gpedit.msc

3) Hit enter.

It will launch the group policy editor..

4) On that Navigate to..

Computer configuration -> Administrative Templates =>System =>Removable Storage Access

5) You can see different options on the right pane,on that select

Removable Disks: Deny Write Access Policy.

6) On the next window,click Enabled.

7) Click on Apply - > OK.

8) Close the window.

Incoming : write protected sd card,write protected pen drive,write protetion removal tool download,write protected remove software,how to remove write protection from usb in windows 10,write protect hard drive windows 10,how to unwrite protect a hard drive,write protected hard drive windows 10

How to lock your computer after certain login attempts in Windows 10 [Anniversary Update Tutorial]

If you wish to lock your computer after certain login attempts,then here is an tutorial..

This will not only prevent others from guessing your passwords but will also make them difficult to

enter the password even though it was correct..

Please Note : Follow the steps carefully as it will turn reverse (even if you had entered password

such times then it will lock for some certain time) so proceed with caution.

Just follow my Steps..

1) Press Windows + X Keys and Select Command Prompt ( Admin)

If UAC pops up.select "Yes."


[Video Tutorial]


See : How to Fix 'Yes' Button grayed out in Command Prompt,how to fix,if your 'Yes' was grayed

out.

2) You will get Administrator : Command Prompt window,on that do as follows.

Type net accounts,it will display something like Lock out threshold,lockout duration,etc..

3) We are gonna change this settings " Lock out"

type the following..

net accounts /Lockoutthreshold:5

this will set the number of attempts,in our case its '5'

if you wish to set the attempts to 7,then set it to 7 which will give you 7 chances

Now we need to set the duration for resign-in

i.e.,how much duration our PC needs to be in locked state..

4) For that type the following command

net accounts /lockoutduration:10

[When you tried this for first time,it will show some error, you need to change that to 30 instead of 10 for now to fix the error]

where 10 represents 10 minutes,setting 10 will make your computer to be locked for 10 minutes.

You can set the duration on your wish like 5 minutes or 15 min

but never forget it will make you to wait,even if the person who entered password incorrect was no

other than you..so don't choose high numbers..

5) OK,the next step we need to do is we need to make windows monitor the time,so

type the following command

net accounts /lockoutwindow:10

This command will make us to tell the Operating System the time we need to reset

always set this time to smaller than the lockout duration for better results

Now,You had successfully set the lock time for your PC

but make sure whether you had set correctly..

Type this command,which will display the results

net accounts

there,you can find some change in Lockoutthreshold and duration which indicates you had successfully configured.

If you wish to turn off this ..then,simply type the following

command..

net accounts /lockoutthreshold:0

Typing '0' will turn off..

Enjoy :P.

That's it..

Tags:

windows 7 account lockout duration,windows 10 account lockout threshold,how long will i be locked our of windows 10,how long does windows 10 lock you out for wrong password,windows 7 failed login attempts log,how long does windows 8 lock you out for wrong password,windows 10 wrong password lock out

How to enable god mode in Windows 10 even after Windows 10 Anniversary update [Tutorial]

Windows has a lot of secrets using which we can tune our PC,customize and even change the way it 

look.If you are not new to windows then you may had already aware of this thing.Yes,there exists a 

mode that have shortcut for all settings available in our PC which is popularly called god mode.It 

Worked on Windows 8.1,Windows 8,Windows 7....OS and not surprisingly it was tested working on 

our Windows 10 PC's running Windows 10 latest build OS.If you are novice to Windows then here is 

an tutorial that may give you a chance to enable hidden god mode.

Do you need to download any software ??

The Answer for this question is NO,this is because this option was an inbuilt thing ,all we need to do is to instruct your PC to go to that registry key.

How to do that ??

Just follow my steps...


[Video Tutorial]


1) login to your Windows PC.

2) Right Click on your desktop and Select New -> Folder.

3) Wait ! You can name it as anything for example even your name ...

But don't forget to add period . and the below key/words..

The Key is {ED7BA470-8E54-465E-825C-99712043E01C}

for example : Name that as lw.{ED7BA470-8E54-465E-825C-99712043E01C}

4) Hit enter.

You can see the icon of that new folder now looking like a control panel icon,if it was then you have 

done right!else re-check/enter the values again.

5) Now click and open the new shortcut ,you can see all shortcuts now appearing on that shortcut.

That's it..

Enjoy..!

How to remotely shutdown any PC if you are using Windows 10,8.1,8,7 and XP [Guide]

Shutting down our PC is the most common task done by most of us.We just shutdown when we no

more wants to work.Well,but the thing is more number of people are increasingly asking me how to 

shutdown other's PC.And when i asked why??,Most number of people simply said its just to make 

some fun and some others' reason's were little bit different like they need to show  their computer 

skills..Anyway whatever may be the reason here is how to do it...

Things you must remember before doing this...

You need IP Address of the machine you are going to shutting down,so 

A Simple trick that may be helpful in finding that..

First find your ip address and replace the last two/one digits as only last digits will differ in most

cases.

For example : if your ip address  was 172.1.1.3 then replace 3 with some digits like 4 or 5(if you need to shutdown your near by system) or 45 depending on the system's distance.

You and the target system must be connected to same network ( like lan).

Never forget this " you must use this only if you are authorized to do,as using this will make you to quit your job if you are working on IT fields (which depends on your companies rules)

OK,let's see how to do this...

Just follow my steps..


1) Press Windows + R Keys..

2) type " Shutdown -i"

3) Hit OK/ Enter Key.

4) The remote shutdown dialog box will appear...on that do as follows.

5) Click on the Add button.

6) Type the computers Ip Address there.


7) Click OK.

8) Now,select what you want to do on that computer..for example : Restart/shutdown/Annote remote 
shutdown..

Click on the image to view full Size..

9) Check/Uncheck the box " Warn users of the action...."

If you check they can close the warning.

if you unchecked the box then no warning box will be displayed.

10) Select anything like hardware maintanence,security,etc (the thing you wish) on shutdown event tracker.

11) If you want to display your specific message like 'bye' then select Others (planned) and comment that message on the comment box,

12) After you finished everything click OK.

Now you can see that system Restarting/shutting down...

Enjoy...

How to keep your laptop On when you close the lid in Windows 10 [Tutorial]

If you have laptop running Windows 10/8.1/8/7 OS then you  may had experienced this issue( at

least once) which is your laptop automatically goes to sleep/hibernate even shutdown when we close

the lid.So here is an tutorial to prevent it from sleeping/hibernate/shutdown.

What we need to do ??

We need to change an option on Control Panel to fix this...

Just follow the below steps...


If you have any difficulty in following below steps,then check the above video which explains them 

in detail...


Step 1 : Login to Your PC(Which is The Primitive Step)

Step 2 : Open Control Panel.

[See : How to Open Control Panel Easily]

Step 3 : Click On Hardware And Sound.

Step 4 : A New Window Will Open On that Select, Power Options Which Will Be on the 

Right Pane,Below to Sound.

Step 5 : Click On Change When the Computer Sleeps.Which Will Be on Left Pane.

Step 6 : Click on Change Advanced Power Settings.

Step 7 : It Will Open A new Window, on that Click on "Power buttons and lid".

Step 8 : Expand and click lid Close action - > Select 

On battery,Plugged in - > Set it to Do nothing.

Step 10 : Click on Apply

Step 11 : Click on OK.

Step 12 : Close the Windows.

That's it..

Incoming Search terms:

close the lid,close the lid windows 10,close the lid of laptop without sleeping,close the lid windows 8.1,close the lid windows 8,close the lid windows 7,close the lid meaning,close the lid windows 10 settings,close the lid windows 10 sleep,close the lid windows 10 standby,closing the lid windows 10 settings,windows 8 close lid,how to keep laptop on when lid is closed,windows 8 laptop close lid.

Works on Windows 10,8.1,8 and 7(Some steps may differ)...


How to get back missing Sleep option on Windows 10 PC [Tutorial]

Sleep is an option used to suspend all operations for a period interval of time.It Will be available in

all latest Windows editions. We can put our computer to sleep for a particular period of time by 

choosing sleep in power options.But Some of our users reported that they couldn't find sleep option 

in power menu which lead us to create a separate tutorial to show how to get back sleep option on 

Windows 10.

Works on Windows 10,8.1,8.

Just follow the below steps..


Follow the steps in the above video if you have any difficulty in following below steps...


Step 1 : Login to Your Windows 10 PC.

Step 2 : Open Control Panel.

[See : How to Open Control Panel Easily]

Step 3 : Click on Hardware and Sound.

Step 4 : Find and Click On Change What the Power buttons do.

"the Option Change What the Power button do Will be Available under Power Options.

Step 5 : Click on Change Settings that Are unavailable on the Window that Opens.

Check Sleep box - > Save Changes...

That's it....

How to turn on or turn off Remote assistance on Windows 10 [tutorial]

Assistance is the most needed thing for most of us in our day to day life,Sometimes we need some one to show how to do a particular task. For example,let's take how to open control panel in Windows 10? if the person is near to you, then they can simply tell you or show you how to do that till you understand, but if you failed to understand the topic then i guess i don't need to say till what extent it will go to which is a different topic.

But the problem is, if the person is near to you then they can get this issue fixed by guiding you. What if the person is far from you? Still you don't need to worry. Because we have an option called remote assistance. Remote assistance is nothing but the concept of getting assistance from someone through Online. Luckily Windows 10 have an inbuilt option for that. Just turn on remote assistance in Windows 10, and relax. They can get the job done for you. Once its finished, you can simply follow the below steps to turn off remote assistance as well to prevent further access.


Just follow the below steps...


Check the above video tutorial,if you find any difficulty in following below steps...

How to turn on Remote assistance in Windows 10.


Press Windows + R - > type Control - > OK (it will open Control Panel) - > System and Security - >

Select  "Allow remote access" on right pane.

Check the box "Allow remote assistance connections on this computer".

Choose Allow remote connections to this computer under remote desktop. - >Apply - > OK.

That's it.


How to turn off Remote assistance in Windows 10 :

Follow the same steps, now Uncheck the box " Allow remote assistance connections on this computer"

Choose Don't allow remote connections to this computer under remote desktop - > Apply - >Ok.

That's it...

Hope it is helpful.

How to view and rename your Windows 10 Computer [tutorial]

Every thing has its name from living things to non living things(like our PC).Microsoft thought the

naming idea and included an option to name our Computer.We will be prompted to

choose our Computer's name while we install/upgrade our OS.If you had typed it incorrectly or wish

to know the name of your PC ,then don't worry here is an guide to change/find name...

Just follow the following steps...

Works on Windows 10,8.1,8 &7.


Check the above video tutorial,if you find any diffculty in following below steps...

Press Windows + R - > type Control - > OK (it will open Control Panel) - > System and Security - >

Select  "See the name of this computer" on right pane you can find your PC name on right pane there,

To Change:

Select Change settings -> Change on the Window that opens - >Type your computer name -> OK- >

Restart Now.

After restart you can see your PC name was now changed.

That's it...

Do comment if you have any doutbs,,,

Hope it is helpful.


Incoming Search terms:

change pc name,change pc name in windows 10,change pc name in windows 8.1,change pc name in windows 8,change pc name in windows 7,how to change name of the pc running windows 10,find computer name in windows 10,windows 10 change pc name,how to change my laptop name,how to change pc name in windows 8.


How to remove Social2Search from your browser and Windows 10 Computer {Tutorial}

Social2Search is an Advertising Platform that targets users by running advertisement on the sites

they visit including Google. They are served through some freewares (when a user clicks on

next,next,etc while installing some apps)

Resetting the browser will never work ,which you can try at first.

So here is an tutorial for removing social2search completely from your PC.

Just follow the steps...


Follow the steps in the above video 

[or] below steps.


After uninstalling - > Open your browser - > go to google/bing/any other search engine - > type 

Adwcleaner (Which is a freeware and working software) ->download it from official site - >

Install the tool - > Click Scan - > After scanning has finished,click Clean -> Restart Your PC.

After restart you can see the tool was completely removed from your PC.

That's it..

Comment if you have any doubts.

Hope it is helpful.


Solution for the following questions [we search in google are same...]

social2search,social2search virus,social2,social2search adware,how to remove social2search windows 10,how to remove social2search ads,social2search download,social2search ads,uninstall social2search,remove social search ads,how to remove social2search windows 8,how to remove social2search windows 8.1,how to remove social2search windows 7.

How to allow/block an app through firewall on Windows 10 [Tutorial]

 How to allow/block an app through firewall on Windows 10 [Tutorial] - Firewall,the best security agent that filters our incoming and outgoing connections have certain 

rules to be followed as per its code,Which leads it to block some apps accessing internet.So here 

is an tutorial to allow and block an app through windows firewall.

Just follow the below steps...


Press Windows + R - > type Control - > OK (it will open Control Panel) - > System and Security - >

Select  "Allow an app through firewall" on right pane. - > Scroll down/up and select an app

Check box to Allow

Uncheck box to block.

Private =  Your Home network.

Public  = Network in public places like free wifi on airports...

If your app was not found on list :

Select browse - > Select the apps location - > Open - > Follow the above steps for allow/block.

After completion,close the window.

That's it..

Hope it is helpful.


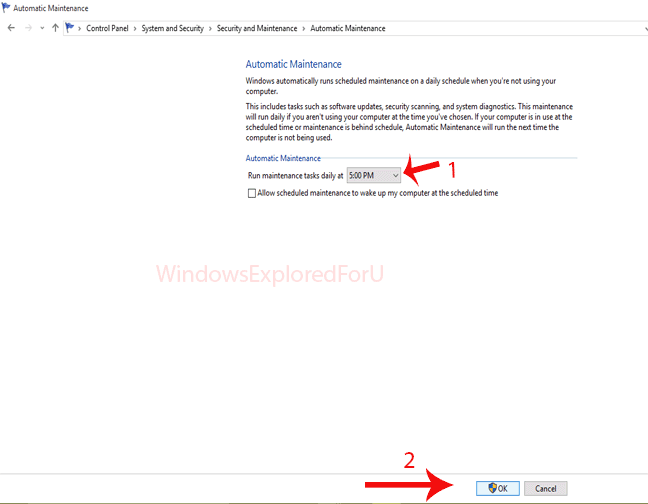
Automatic maintenance in Windows 10 [Explained]

This Post was Moved here


Here is a short post of the above one.

Step 1 : Login to Your Windows 10 PC.

Step 2 : Open Control Panel.

[See : How to Open Control Panel Easily]

Step 3 : Click on Review Your Computer Status Under Security & Maintenance.

Enable Automatic Maintenance in Windows 10

Step 4 : Click on Maintenance on the Right Pane.

Click Start Maintenance to start Maintenance tasks immediately.

Else,

Step 5 : Click On Change Maintenance Settings.

Step 6 : Select Maintenance timing According to Your Wish.

Enable Automatic Maintenance in Windows 10


Step 7 : Click On OK.

Step 8 : Close the Window.

That's it...


How to disable Windows Error reporting permanently in Windows 10 [tutorial]

Works on Windows 10,8.1,8 and 7.

Windows + R - > Services.msc - > OK - > Find Windows error reporting service - > Select and Right click it - > Properites ->  Disabled - > Apply  - > OK.

Method 2 :

Windows  + R - > Gpedit.msc - > under Computer configuration,select Administrative templates - > All settings on right pane - > Find Disable Windows Error Reporting service - > Click to open - > Check Enabled - > Apply - > OK.


That's it...

Hope it is helpful.

Incoming Search terms :

windows error reporting,windows error reporting 1001,windows error reporting service,windows error reporting windows 10,windows error reporting registry,windows error reporting location,windows error reporting tool,windows error reporting windows 7,windows error reporting disable,windows error reporting turn off,windows error reporting disable windows 10,windows error reporting disk usage,windows error reporting disk space,windows error reporting service manual or automatic,windows error reporting windows 8 disable,disable windows problem reporting windows 10,windows error reporting server 2008,windows error reporting service disable windows 10.

How to open a site using run command in Windows 10,8.1,7 [tutorial]

In this post let's see how to open a site using run command which will help in making our tasks easier..

To do this you need a Windows PC running Windows 10,Windows 8.1,Windows 8 or Windows  7,etc..

Steps :

Press Windows + R you will get run command - > type your website name in the box - > Click OK.

If you don't know,check the below video..


Enjoy.

Incoming search terms :

open website using proxy,open site using ip address,open website using cmd,open website using ip,open website using run command,open website using cmd windows 10,open website using run windows 10,open website using ip windows 10,open website using run windows 8.1,open website using run windows 7,open website using run windows 8.

How to restore the desktop background you accidentally changed in Windows 10 [Tutorial]

Sometimes our favourite background may be changed by OS,other users and (not surprisingly us).

But what if you are in a suitation to set the image previously used but it was deleted/not found ??

that's really bad right ?? Don't worry here is an tutorial to restore the image...

We can use the Windows's thumbnail feature,to say in simple words it is nothing but a copy of the

original file.

Enough Said let's see how to do it..


Right click mouse on the empty area of desktop -> Personalize ->Select the image you wish to

restore. Visit again your desktop you can see it's there..


Don't forget to Comment if you have any doubts..


Thank you.

Incoming search terms:

change the background of desktop windows 10,restore the desktop background,restore background,restore background intelligent transfer service,restore the desktop background windows 10,restore the desktop background windows 8.1,restore the desktop background windows 7,restore the desktop background windows 8,restore the desktop background windows xp,windows 10 desktop background location.

[Tip]  The steps are same for Windows 8.1/8/7:)

Enjoy.

How to uninstall a program in Windows 10 [Video Tutorial]

If a program worked on previous Windows editions like Windows 8.1/8/7/XP and doesn't Work on

Windows 10,you can troubleshoot a program to work on Windows 10,but if that too failed,then the

best solution is to uninstall it as it will save disk space and prevent occupying our RAM.

If you don't know how to uninstall a program then don't worry,just follow the steps in the below

video (where i had explained everything in a easiest way)as it is in your PC.


The steps are same for Windows 8.1/8/7 PC's too,don't forget to use them if you need to carry out removal process in such systems.


Comment if you have any doubts..

Thank you.

How to open and clear temp in Windows 10 [Tutorial]

In this tutorial let's see how to open and clear temp files in Windows 10.

Though this tutorial was created on Windows 10,it works on Windows 8.1,8,7,Vista and XP.


Hope it is helpful.

[Fix] Microsoft Update Catalog error in IE of Windows 7.8,8,1,10

Check the Following steps to fix the issue.


Official link:

https://support.microsoft.com/en-us/mats/ie_performance_and_safety?wa=wsignin1.0

Running those steps will reset internet explorer add on's,its Problems and others..

Hope it is helpful.

Incoming search terms:

microsoft update catalog ,microsoft update catalog Windows 7,microsoft update catalog Windows 10,microsoft update catalog not working,microsoft update catalog add on failed to run,can t download from microsoft update catalog,microsoft update catalog windows 8,microsoft update catalog add on,ms update catalog,microsoft update Windows 7.

Change the position of taskbar in Windows 10 [Guide]

Change the position of taskbar in Windows 10 that's what we're going to see in this post. Taskbar is one of the most important thing that both makes our work easy as well as messy. Sometimes, we don't like the position of taskbar or sometimes accidentally taskbar position might be changed in our Windows 10 or sometimes you might have even seen the taskbar appearing on top of Windows 10, right side of Windows 10, on left side of windows 10 and so on somewhere and just want to change on your device as well as it gives a different kind of look. 

Whatever it may be the reason, If you wish to change the position of taskbar from bottom to somewhere like on left side or right side or even to top then here is an guide for you.

Although this was created on a machine running Windows 10 OS,it still works on previous editions like Windows 8.1,8 and 7 editions.


How to change taskbar location in Windows 10 [Guide]

Just follow the steps,you see in the upcoming video its simple, if you want to place taskbar on top just click on the taskbar and drag it to top, sameway to left for left/ right for rightside..


Hope it is helpful.

Plz,do comment if you have any doubts..

Enable or disable an User account in Windows 10 [Beginners guide]

Enable or disable user account in Windows 10, that's what we're going to see in this post. We have so many ways to disable an user account in Windows 10. But Instead of directly disabling the account, you can consider setting time restrictions for the user which will be greatly helpful when it comes to family persons or Kids. As setting time restrictions will allow the particular person to login only on the particular time. On all other times, the user account will still remain locked, so they cannot be able to login.But if you still need to lock the user account, i.e; Disable a particular user account then you are good to go.

Enable or disable user account in Windows 10 [ How to guide]

Enabling or disabling user account is very simple. There are variety of ways available one of the way is using local users groups and policy section and another one is using CMD.

Just open CMD and type net user (insert user name here) /active:no and hit enter, you will see the account being locked in fraction of seconds, else follow the second step.

Check the following video for detailed steps...


Hope it helps...

Prevent changing start menu background in Windows 8

Hi,in this tutorial lets see how to prevent others from changing Start menu background in 

Windows 8,8.1 and Windows 10 PC.

Note: Since Windows 10 is a Successor of Windows 8 &8.1 it Contains Most of the Options 

Similar to the One in Windows 8 and 8.1.(With Slight Change in names.)So We Can use All 

the Setting Options as in Previous editions.

What is Start menu Background ??

As the name tells the meaning Start Screen background is an Option Which Allows Us to 

Change the Background of Start Screen,A Start Screen is Nothing But the One Which 

displays the list of Apps and Others When You Press the Windows Key.We Can Change 

the Background as Per Our Wish. But Our Background Can be Changed by other 

People Who use Our PC,So if You Wish to Prevent Others from Changing the menu 

Background then here is an tutorial.Just Follow the Upcoming Steps in Your PC.


Step 1 : Login to Your Windows PC As Admin.

Step 2 : Press Windows +R Key Simultaneously.

It Will Popup the run Command.On it type gpedit.msc

Step 3 : Hit Enter.

Step 4 : It will Open a new Window,Which is Local Group Policy Editor.

Step 5 : On that Navigate as Follows.

Computer Configuration->Administrative templates->Control 

Panel->Personalization.

Step 6 : You May Find an Option,Prevent Changing Start menu background 

on the right Pane.

Prevent changing start menu background in Windows 8


Step 7 : Click on it.

Step 8 : It Will Open A New Window, on that Select Enabled.


Prevent changing start menu background in Windows 8


Step 9 : Select/tap Apply.

Step 10 : Click on Ok.

Step 11 : Close the Window.

That's it...Now no one Can Change the Start menu background of your PC.

If You Planned to Change in Future,Simply Change it Not Configured.

Other related Posts to Check :