} -->
Showing posts with label Intermediate. Show all posts

Windows 10 Fall Creators Update : How to Disable apps like candy crush from auto installing on Windows 10 Fall Creators Update [Guide]

How to disable apps like candy crush installing/reinstalling on Windows 10 Fall Creators Update, this is what we are gonna see in this post.

One of the most fearsome things, most of the Windows users experience is windows installing unwanted store apps when you install a fresh copy of Windows 10. Though most of the users hadn't experienced this issue, some users reported that windows installs the unwanted apps like candy crush without their permission after upgrading from previous Windows 10 creators update (Windows 10 automatically installs candy crush).

So, if you dont want your Windows 10 PC to install such apps, then you can simply follow the below steps to prevent windows 10 from installing candy crush.

Note : Inorder to stop windows 10 from installing candy crush on Windows 10 fall Creators update you need to make the change in registry, so proceed with caution.


1) Open registry editor.

2) Backup registry,

3) Navigate to the following registry..

HKEY_LOCAL_MACHINE\SOFTWARE\Policies\Microsoft\Windows

4) Now,right click on the Windows folder and select New-> Key

name the key as CloudContent

and follow the remaining steps..

Create a new DWORD on the right pane and name it as DisableConsumerFeatures

Set its value data to 2 or 1.

2 will work in most cases..

5) Click OK to save changes, restart your PC.

That's it,

But, If the above method seems hadn't worked in your Windows 10 Build 1709 Fall Creators

update then try these below steps too..

1) Press Windows + R - > type Secpol.msc

2) Select Application Control Policies

3) Expand Applocker on left pane.

4) Click on Packaged App Rules

5) Now,on your right pane,right click and select "Create new rule"

6) When you clicked it will open a new window with Before you begin,Permissions
and some other options on left pane

7) Select Permissions tab.

8) On the right pane,you can find Action button select Deny on that and click Next.

9) On the next Window,select the dot Use an installed packaged app as reference.

10) Click on  "Select "

11) It will pop up another window,on that scroll down and check the box "Windows Spotlight"

12) Click OK.

13) Again click on Create.

14) Restart Your PC for Changes to take effect..

You can also check the video tutorial, which explains the same.


Rename Network name in Windows 10 {How to do tutorial] [Updated]

Rename Network name in Windows 10 - That's what we gonna see in this post...

Works on Windows 10

Creators Update, Windows 10 Anniversary Update, and other editions of Windows like Windows 10

earlier builds like Aug 2015 and Nov 2015 builds...

In our last post, we had seen how to disable wifi sense in windows 10, i asked you to add some thing

to the end of the network name, but i hadn't shown how to change network name [SSID] in windows

10.

if you are thinking about how to change network name in windows 10 or how to rename network connection windows 10 or even how to change ethernet name windows 10 that was active network name windows 10, windows 10 delete network profile..then,

We can use many methods to change network name like using gpo ,registry edtitor and powershell..

Using Powershell is a little bit advanced technique, so we use registry editor in this post.

How to rename a network in Windows 10 

Just follow the below steps..


[VIDEO TUTORIAL]


1) Open registry editor

[How to Open Registry editor in Windows 10 [ Beginner's way]

2) Go to the following Key

HKEY_LOCAL_MACHINE\SOFTWARE\Microsoft\Windows NT\CurrentVersion\NetworkList

3) When you expanded the networklist, you will see the Profiles (folder) Key

4) Click on it and expand.

5) Here comes the main part..

There many be many subkeys (folders) with a very long name,when you expand the profiles folders, which depends on the number of network you had connected.

Click on each network, and on your right pane you will see the profilename text.

Check every subkeys until the profilename data matches the name of your network..

For example : If your network name was logesh, then you will find profilename as logesh (on your right pane) on any of the folders that were under Profiles subkey.

6) Restart your PC

When you restarted again, you will see the network named now..

That's it..

Hope it is helpful.

Enable Special Characters as PIN or how to set up more characters for PIN in Windows 10 - How to guide

People love an security who does great security job for us,that is what Microsoft remembered when

it decided to include some extra security features in its much praised Windows OS Windows 10. This

feature was especially designed for Microsoft Windows Enterprise editions..Which will allow you to

include Special characters in our PIN sign in password.

In this tutorial,let's see how to enable an option that will allow us to include special characters in PIN

of Windows 10 Sign-in Password.

As said earlier,we need group policy editor to customize this setting..

You can install it on your Windows 10 Pro,Home editions,using the method provided here..

if you have group policy editor then follow the below steps..


Step 1 : Login to Your Windows 10 PC.

Step 2 : Press Windows + R Keys Simultaneously and type Gpedit.msc

Step 3 : Hit Enter.

Step 4 : It Will Open a new Window,which is Local Policy Editior,On that Navigate as 

follows.

Click on Computer Configuration->Administrative Templates->All Settings.

Step 5 : Find PIN Complexity Option.

(or)

Click on Computer Configuration->Administrative Templates->Windows Components->Windows Hello for Business->PIN Complexity

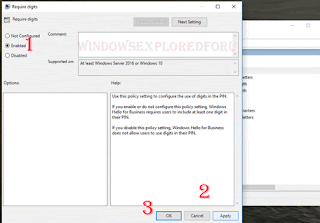
Step 6 : Click on Require Special Characters

Step 7 : It will Open a new Window,on that select Enabled 

Enable Special Characters in PIN of Windows 10


Step 8 : Click on Apply.

Step 9 : Click on OK.

Step 10: Close the Window.

Now,visit your PIN category on settings and type your PIN,you can see your changes as windows will now accept Special Characters as PIN..

That's it..

Hope it helps..😐

How to turn on and turn off adaptive brightness in Windows 10 [Tutorial]

Ever Wondered your PC can change Brightness automatically??? Even small android Mobiles have

the adaptive brightness and it can set brightness right??,then why can't your PC??

Yes ! the option exists,your PC is capable of changing brightness automatically, the thing is  most of

us are not aware of this,which is the reason behind.

So here is an tutorial to show how to set automatic brightness in your Windows 10.

Note : Your PC should have light sensor for this tutorial to work...

Ok,I Don't like to waste your time by providing a brief description about that,let's see how to do

this...

Just follow the below steps...


If you have any difficulty in following below steps,then check the above video which explains them 

in detail...


Step 1 : Login to Your PC(Which is The Primitive Step)

Step 2 : Open Control Panel.

[See : How to Open Control Panel Easily]

Step 3 : Click On Hardware And Sound.

Step 4 : A New Window Will Open On that Select, Power Options Which Will Be on the 

Right Pane,Below to Sound.

Step 5 : Click On Change When the Computer Sleeps.Which Will Be on Left Pane.

Step 6 : Click on Change Advanced Power Settings.

Step 7 : It Will Open A new Window, on that Click on "Display".

Step 8 : Expand and click Enable adaptive brightness - > click

On battery,Plugged in - > Set it to ON.

Step 10 : Click on Apply

Step 11 : Click on OK.

Step 12 : Close the Windows.

To Turn OFF:

Set it to OFF While you are on step 8.

That's it..


Incoming Search terms:

adaptive,adaptive brightness,adaptive brightness windows 7,adaptive brightness windows 10,adaptive brightness windows 8,adaptive brightness windows 8.1,adaptive brightness battery,adaptive brightness windows 10 won't turn off,adaptive brightness windows 10 disable,adaptive brightness windows 10 not working,change adaptive brightness windows 10,disable auto brightness windows 10,windows 10 screen brightness changing,windows 10 auto brightness problem,how to turn off auto brightness windows 8.

Hope it is helpful...

Comment if you have any doubts...

Thank you.

How to allow/block an app through firewall on Windows 10 [Tutorial]

 How to allow/block an app through firewall on Windows 10 [Tutorial] - Firewall,the best security agent that filters our incoming and outgoing connections have certain 

rules to be followed as per its code,Which leads it to block some apps accessing internet.So here 

is an tutorial to allow and block an app through windows firewall.

Just follow the below steps...


Press Windows + R - > type Control - > OK (it will open Control Panel) - > System and Security - >

Select  "Allow an app through firewall" on right pane. - > Scroll down/up and select an app

Check box to Allow

Uncheck box to block.

Private =  Your Home network.

Public  = Network in public places like free wifi on airports...

If your app was not found on list :

Select browse - > Select the apps location - > Open - > Follow the above steps for allow/block.

After completion,close the window.

That's it..

Hope it is helpful.


How to scan USB drive using Windows defender in Windows 10 [ Video tutorial]

In this post,lets see how to scan a USB drive using Windows defender.


[Video Tutorial]


How to scan USB drive using Windows defender in Windows 10 (in short)

Plugin your USB drive - > Press Windows Key - > Type Windows Defender - > Select Custom - > 

Check the usb drive - > OK.

Wait till the scan completes,and clear if there are any threats...

That's it.

Comment if you have any doubts,,,

Automatic maintenance in Windows 10 [Explained]

This Post was Moved here


Here is a short post of the above one.

Step 1 : Login to Your Windows 10 PC.

Step 2 : Open Control Panel.

[See : How to Open Control Panel Easily]

Step 3 : Click on Review Your Computer Status Under Security & Maintenance.

Enable Automatic Maintenance in Windows 10

Step 4 : Click on Maintenance on the Right Pane.

Click Start Maintenance to start Maintenance tasks immediately.

Else,

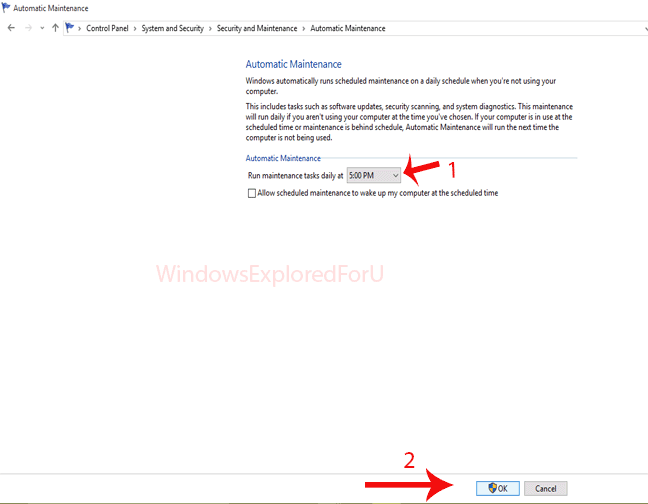
Step 5 : Click On Change Maintenance Settings.

Step 6 : Select Maintenance timing According to Your Wish.

Enable Automatic Maintenance in Windows 10


Step 7 : Click On OK.

Step 8 : Close the Window.

That's it...


Reset Microsoft Edge browser to defaults in Windows 10 [Tutorial]

Reset Microsoft edge browser to its default settings in Windows 10 - that's what we're going to see in today's post. We can actually reset edge browser settings in many ways like using powershell and cmd. We will see the easiest way in this post.

Microsoft Edge the brand new browser for Windows 10 will fail sometimes by not working in the way it was programmed to work.Like others we can reset this browser settings to their defaults.. But the steps involved are little bit different,but don't worry i had explained it clearly in the below video..


If you don't want to follow video tutorial, then here is the normal version.

How to reset Microsoft Edge through Powershell

1) Open Powershell as admin.


2) But, before that type the following by pressing Windows (logo) Key + R keys and Hit enter.

AppData\Local\Packages\Microsoft.MicrosoftEdge_8wekyb3d8bbwe

Delete everything on the folder.

3) Now, open powershell and type the following and hit enter.

Get-AppXPackage -AllUsers -Name Microsoft.MicrosoftEdge | Foreach {Add-AppxPackage -DisableDevelopmentMode -Register “$($_.InstallLocation)\AppXManifest.xml” -Verbose}

That's it.

Your MS Edge browser is now reset.

Also Read :

Microsoft now recommends Chromium based Edge - Here are the Official download links.

How to turn on tracking protection in MS Edge

[Fix] Microsoft Update Catalog error in IE of Windows 7.8,8,1,10

Check the Following steps to fix the issue.


Official link:

https://support.microsoft.com/en-us/mats/ie_performance_and_safety?wa=wsignin1.0

Running those steps will reset internet explorer add on's,its Problems and others..

Hope it is helpful.

Incoming search terms:

microsoft update catalog ,microsoft update catalog Windows 7,microsoft update catalog Windows 10,microsoft update catalog not working,microsoft update catalog add on failed to run,can t download from microsoft update catalog,microsoft update catalog windows 8,microsoft update catalog add on,ms update catalog,microsoft update Windows 7.

How to reset password for user account using admin account in Windows 10 [Tutorial]

If you had forgot password for an user account,you can reset your password in many ways like using

password reset disk,using command prompt and much more..Here is an another easiest way to reset

password for your user account when you can login to admin account.

Here is how it is...

Just follow the below video,where i had shown step by step things you need to do...


Comment if you have any doubts...

Thank you.

How to hide and unhide smiley face on Internet Explorer [Video]

Check the below video for detailed steps...


Don't forget to let us know,if it failed to work...

Thank You.

Snap not working in windows 10 [FIX]

Check the following video for detailed information..


If the above video doesn't work,see the following video ....


"Hope it is helpful"

How to activate and deactivate slide to shutdown feature in Windows 10


We Can Shut down our Windows 10 PC in many Ways,like using alt+f4,start,run,etc here is 

an another way to shut down our Windows 10 PC especially useful in touch enabled 

PC's.All we need to  perform is  a simple slide.

How to do it ?? 

Enabling Slide to Shutdown is an easy process,just follow the Upcoming steps.

Step 1 : login to Your Windows 10 PC.

Step 2 : Press Windows logo + R Key.

Step 3 : It Will Pop up run command,on that type

Slidetoshutdown

Step 4 : Hit enter

That's it,now pull down the screen to perform Shudown.

How to disable it ??

By default,When you restart your PC,slide to shutdown option is turned off,if your PC still 

displays the message,you can disable it...

For that do as follows.


  • Open control panel.

[See : How to Open Control Panel Easily]


  • Click Troubleshooting.

Click on the image to view full size


  • Select improve power usage.


  • Select next on the window that follows.


  • Close and restart your PC.


That's it...

How to uninstall driver in windows 10

Drivers are the one which causes Our PC to work Perfect,A PC With perfect driver will work 

perfectly. But Some times,that drivers too cause Problems in Our PC.The issue may be due 

to installed outdated device driver or the driver that has some errors or Whatever it may 

be.it Will Cause Errors in Our PC.And Particularly in Windows 10 Where Our Windows 

update is set to automatic Will download the driver Without Checking of errors.

So,you need to Uninstall that driver to make your PC stable again.So here is an tutorial for 

explaining how to uninstall driver in Windows 10.

How to Uninstall ??

Just follow the Steps below.

Step 1 : login to your Windows 10 PC.

Step 2 : Press Windows + R Keys Simultaneously.

Step 3 : It Will display Run Command,on that type the following command.

"devmgmt.msc" (Without Quotes)

Step 4 : Hit Enter,Or press OK.

Step 5 : It Will open a new Window which is known as device manager,on that do as 

follows.

Step 6 : Find the driver that is Causing issues.

(For example : If the issue was caused by display driver,click under display,Similarly if it 

was due to driver installed due to windows update, Visit the windows update option and find 

the driver in list of updates.)

Step 7 : Select the driver.

Step 8 : Right Click on it and Select uninstall.

How to uninstall driver in windows 10


Step 9 : It Will prompt Warning Message Stating about that You Are going to uninstall that 

driver,ignore it and Select Ok,and Follow the Next Steps which depends on the driver.

Step 10 : Wait till the uninstall Completes.After completion,Close the Window. 

Note : Some drivers needs your PC to be restarted for Complete uninstall,on Such 

Cases,Save Your Unsaved  Work and Select restart.

That's it...

Warning : If the driver was installed through Windows Update,Your PC Will try to 

reinstall the Same update again,you need to temporarily stop the update from 

reinstalling[Check thisfor Steps.

Other Articles:

7 Ways to Run Cmd as Admin in Windows 10

How to Access CMd at boot ???

[Click to See all Windows 10 Articles]

Turn on or off Fast Startup in Windows 10

In this Article lets see how to turn on or off Fast boot in Windows 10.

What is Fast boot ???

Fast boot is an Option introduced in Earlier Windows Editions like Windows 8, and Since it 

become huge Success it followed to other editions too. This Fast boot is an Option 

designed for fast booting our PC.

How to Check Whether Fast boot is Enabled or disabled ???

By default Fast boot is enabled in Windows 10 Os.We need to Makesure Whether Fast 

boot is enabled or not Which help in Faster booting of Our PC.If had enabled hibernate 

Mode,then it indicates Fast boot is enabled.

If You Wish to disable or enable Fast boot then follow the Steps below as it is in Your 

Windows 10 PC.


Step 1 : Login to Your Windows 10 PC.

Step 2 : Open Control Panel.

[See : How to Open Control Panel Easily]

Step 3 : Click on Hardware and Sound.

Step 4 : Find and Click On Change What the Power buttons do.

"the Option Change What the Power button do Will be Available under Power Options.

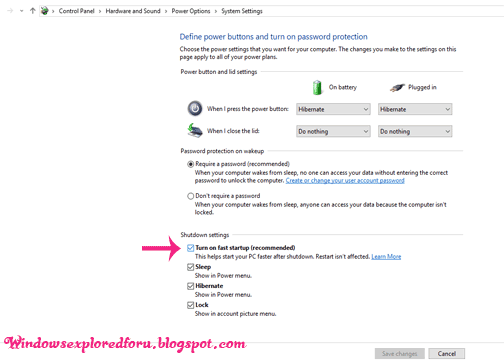
Step 5 : Click on Change Settings that Are unavailable on the Window that Opens.

Turn on or off Fast Startup in Windows 10


To Enable Fast Boot :


  • Follow Steps 1 to 5.


  • Find and Check Turn on Fast Startup Option.

  • Click on Save Changes.
Turn on or off Fast Startup in Windows 10


To disable Fast Boot :


  • Follow Steps 1 to 5 


  • Uncheck Turn on fast startup Option.

  • Click on Save Changes.


Close the Window.

That's it...

Change Screen resolution in windows 10 and 11 : Your Ultimate beginner's Guide

Are you struggling to change the screen resolution on your Windows 10 or Windows 11 computer? Look no further! Our comprehensive guide provides step-by-step instructions tailored for beginners, ensuring you can easily adjust your screen settings for optimal clarity and performance. Understand what screen resolution is, why it matters, and learn the common resolutions available for your system. With clear, user-friendly guidance, you'll master how to access the Display Settings, change the resolution, and even troubleshoot any issues that may arise. Plus, we cover how to configure multiple displays, adjust scaling, and utilize advanced settings for a personalized visual experience. Whether you’re a casual user or a creative professional, finding the perfect screen resolution will enhance your computing experience. Dive into our detailed guide today, and discover everything you need to know to take control of your display settings effortlessly!


In today's digital landscape, the quality of our visual experience on computers plays a pivotal role in our productivity and enjoyment. Whether you're streaming your favorite shows, working on a presentation, or gaming, having the right screen resolution is crucial. If you're someone who doesn't know much about computers, fear not! This comprehensive guide will walk you through everything you need to know about changing the screen resolution in Windows 10 and Windows 11. From understanding what screen resolution is to step-by-step instructions on how to make changes, we’ll cover it all.

Table of Contents

  1. Understanding Screen Resolution
    • 1.1 What is Screen Resolution?
    • 1.2 Why Does Screen Resolution Matter?
    • 1.3 Common Screen Resolutions Explained
  2. Preparing to Change Your Screen Resolution
    • 2.1 Assessing Your Display and Graphics Card
    • 2.2 Backing Up Your Current Settings
  3. Changing Screen Resolution in Windows 10
    • 3.1 Accessing Display Settings
    • 3.2 Selecting Your Desired Resolution
    • 3.3 Adjusting Scaling for Better Clarity
    • 3.4 Troubleshooting Common Issues
  4. Changing Screen Resolution in Windows 11
    • 4.1 How to Access Display Settings
    • 4.2 Changing the Resolution in Windows 11
    • 4.3 Adjusting Scaling Options
    • 4.4 Fixing Resolution Problems
  5. Using Multiple Displays
    • 5.1 Configuring Dual Monitors
    • 5.2 How to Change Resolution for Each Monitor
  6. Advanced Resolution Settings and Tips
    • 6.1 Refresh Rate Settings
    • 6.2 Custom Resolutions via Graphics Control Panels
    • 6.3 Using External Displays
  7. Conclusion
  8. FAQs about Changing Screen Resolution

1. Understanding Screen Resolution

1.1 What is Screen Resolution?

Screen resolution refers to the number of pixels displayed on your computer screen. It's expressed in terms of width x height (e.g., 1920 x 1080), indicating how many pixels are arranged horizontally and vertically on the screen. Higher numbers generally mean a sharper and clearer image, but it's also important to ensure that your display can handle higher resolutions.

1.2 Why Does Screen Resolution Matter?

Resolution affects the visual clarity of text, images, and videos on your screen. A higher screen resolution can provide a more vivid experience, while a lower resolution may make content appear pixelated or blurry. Additionally, the right resolution can impact your productivity by allowing more content to fit on the screen at once without sacrificing quality.

1.3 Common Screen Resolutions Explained

  • HD (1280 x 720): Standard resolution for basic viewing.
  • Full HD (1920 x 1080): Widely used for gaming and streaming.
  • Quad HD (2560 x 1440): Offers higher clarity, perfect for gaming and graphic design.
  • 4K (3840 x 2160): Ideal for professional work that requires high detail, such as video editing.
  • 8K (7680 x 4320): The pinnacle of clarity, mainly used in specialized fields.

2. Preparing to Change Your Screen Resolution

2.1 Assessing Your Display and Graphics Card

Before changing your resolution, you need to know your monitor's maximum supported resolution. Check your monitor's manual or look up the model online. Also, ensure your graphics card can support your desired resolution, as older models may not handle higher resolutions.

2.2 Backing Up Your Current Settings

It's always wise to make a note of your current resolution and other settings before making changes. You may want to revert to your original configuration if the new settings don't work out.

3. Changing Screen Resolution in Windows 10

3.1 Accessing Display Settings

  1. Right-click anywhere on your desktop.
  2. Select Display settings from the context menu.

3.2 Selecting Your Desired Resolution

  1. In the Display settings, scroll down to the Display resolution section.
  2. Click the dropdown menu to see a list of available resolutions.
  3. Select the resolution you want.

3.3 Adjusting Scaling for Better Clarity

If text and other elements appear too small or too large after changing the resolution, you can adjust the scaling:

  1. In the Display settings, locate the Scale and layout section.
  2. Choose a scaling percentage that best fits your needs (e.g., 100%, 125%, 150%).

3.4 Troubleshooting Common Issues

If you experience issues after changing the resolution (like a blank screen), the system will typically revert to the previous settings after 15 seconds. If it doesn't, restart your computer and boot into Safe Mode to revert the changes.

4. Changing Screen Resolution in Windows 11

4.1 How to Access Display Settings

  1. Right-click on your desktop.
  2. Select Display settings from the menu that appears.

4.2 Changing the Resolution in Windows 11

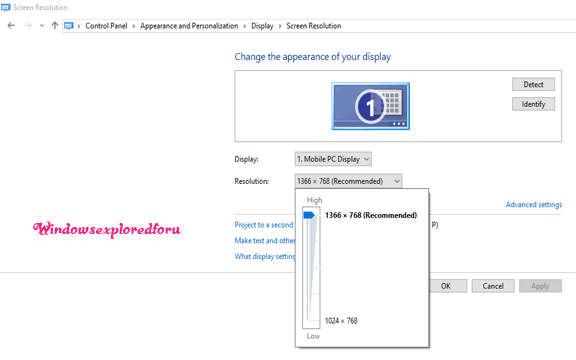
  1. In the Display settings, find the Display resolution dropdown under the Scale and layout section.
  2. Click to see available resolutions and select your desired one.
Change Screen resolution in windows 10

4.3 Adjusting Scaling Options

  1. If you want to adjust the size of text and applications, locate the Scale option.
  2. Choose a scaling option from the dropdown, which offers various percentages based on your display size.

4.4 Fixing Resolution Problems

If your display doesn't look correct, ensure that you have the latest graphics drivers. Sometimes, adjusting the settings within the graphics control panel provided by your GPU manufacturer can also help resolve issues.

5. Using Multiple Displays

5.1 Configuring Dual Monitors

If you use multiple monitors, it’s essential to configure each monitor according to your needs. Windows allows different settings for each display, making multitasking more efficient.

5.2 How to Change Resolution for Each Monitor

  1. Open Display settings as mentioned earlier.
  2. Scroll down to see your connected displays represented by numbers.
  3. Click on the display you wish to adjust.
  4. Change its resolution and scaling as needed.

6. Advanced Resolution Settings and Tips

6.1 Refresh Rate Settings

The refresh rate, measured in Hertz (Hz), indicates how many times your monitor draws the image in a second. A higher refresh rate results in smoother visuals, especially during fast-paced activities like gaming.

  1. Inside Display settings, scroll down and click Advanced display settings.
  2. Select the monitor you wish to adjust and look for the Refresh rate dropdown to make changes.

6.2 Custom Resolutions via Graphics Control Panels

If you need a resolution that isn’t listed in Windows settings, you can often configure custom resolutions using the graphics control panel. Here’s how:

  • NVIDIA: Right-click on your desktop, select NVIDIA Control Panel, and navigate to Change resolution under the Display section.
  • AMD: Right-click on your desktop, select AMD Radeon Settings, then go to Display to find resolution options.

6.3 Using External Displays

If you're connecting a laptop to a monitor or a TV, the settings will be similar. Just make sure to choose the right display (duplicate, extend, or second screen only) based on how you want to use both screens.

7. Conclusion

Changing the screen resolution in Windows 10 and 11 may seem difficult at first, especially for those less familiar with computers. However, with the step-by-step instructions outlined in this guide, you should be able to confidently adjust your display settings to optimize your computer experience.

Remember that the right resolution can elevate your visual enjoyment while ensuring comfortable usability. Whether for work, gaming, or simply browsing, mastering these settings puts you in control.

FAQs:

FAQ 1: How do I find my optimal screen resolution?

To find the optimal screen resolution, check your monitor’s specifications or the manufacturer’s website. Optimal resolutions are usually listed as “recommended” in the settings menu.

FAQ 2: Will changing the resolution affect my graphics quality?

Yes, changing the resolution can impact graphics quality. Higher resolutions generally provide better clarity but require more processing power from your graphics card.

FAQ 3: Can I revert to my previous resolution if I'm unhappy with the change?

Absolutely! If you’re not happy with a new resolution, Windows usually reverts to the previous setting after a brief timeout. If it doesn't, restart your computer, boot into Safe Mode, and revert from there.

FAQ 4: Can I change the resolution using keyboard shortcuts?

Unfortunately, Windows does not support directly changing screen resolution,/script through keyboard shortcuts. You'll need to access display settings manually.

FAQ 5: How can I improve text clarity after changing the resolution?

If text appears fuzzy, consider adjusting the scaling options to make text and images look sharper or use ClearType settings to improve font clarity.


That's it...