WiFi is an awesome technology discovered in this Modern world,All laptops,PC's and
Smartphones have an option to go for an WiFi.Windows 10 too has the setting for
Customizing WiFi settings.So here is an article Which explains the concept of creating
Shortcut for WiFi settings.
How to do it ???
Just Follow the Following Steps in Your Windows 10 PC.
Step 1 : Logon to Your Windows PC.
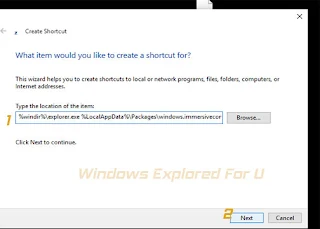
Step 2 : Right click on Any empty area of desktop and Select new->Shortcut.
Type the following in the Box
and Click on Next.
Note : If Your language is not US English then Change en-US According to your Language,Example en-GB for United Kingdom,etc...
Step 3 : Name the Shortcut as,anything You want to be the name,Example : WiFi.
Step 4 : Click on Finish.
Step 5 : Close the Window.
Now Again Right Click on the Created shortcut And Select Properties for changing the icon
for the created shortcut.check the below article for complete steps.
[Click to See : How to Change Icon for Any App/Shortcut in Windows 10]
That's it...
"Hope it is Useful"
Smartphones have an option to go for an WiFi.Windows 10 too has the setting for
Customizing WiFi settings.So here is an article Which explains the concept of creating
Shortcut for WiFi settings.
How to do it ???
Just Follow the Following Steps in Your Windows 10 PC.
Step 1 : Logon to Your Windows PC.
Step 2 : Right click on Any empty area of desktop and Select new->Shortcut.
Type the following in the Box
 |
| click on the image to view full size |
%windir%\explorer.exe %LocalAppData%\Packages\windows.immersivecontrolpanel_cw5n1h2txyewy\LocalState\Indexed\Settings\en-US\AAA_SettingsPageNetworkWiFi.settingcontent-ms
and Click on Next.
Note : If Your language is not US English then Change en-US According to your Language,Example en-GB for United Kingdom,etc...
Step 3 : Name the Shortcut as,anything You want to be the name,Example : WiFi.
Step 4 : Click on Finish.
Step 5 : Close the Window.
Now Again Right Click on the Created shortcut And Select Properties for changing the icon
for the created shortcut.check the below article for complete steps.
[Click to See : How to Change Icon for Any App/Shortcut in Windows 10]
That's it...
"Hope it is Useful"